Introduction
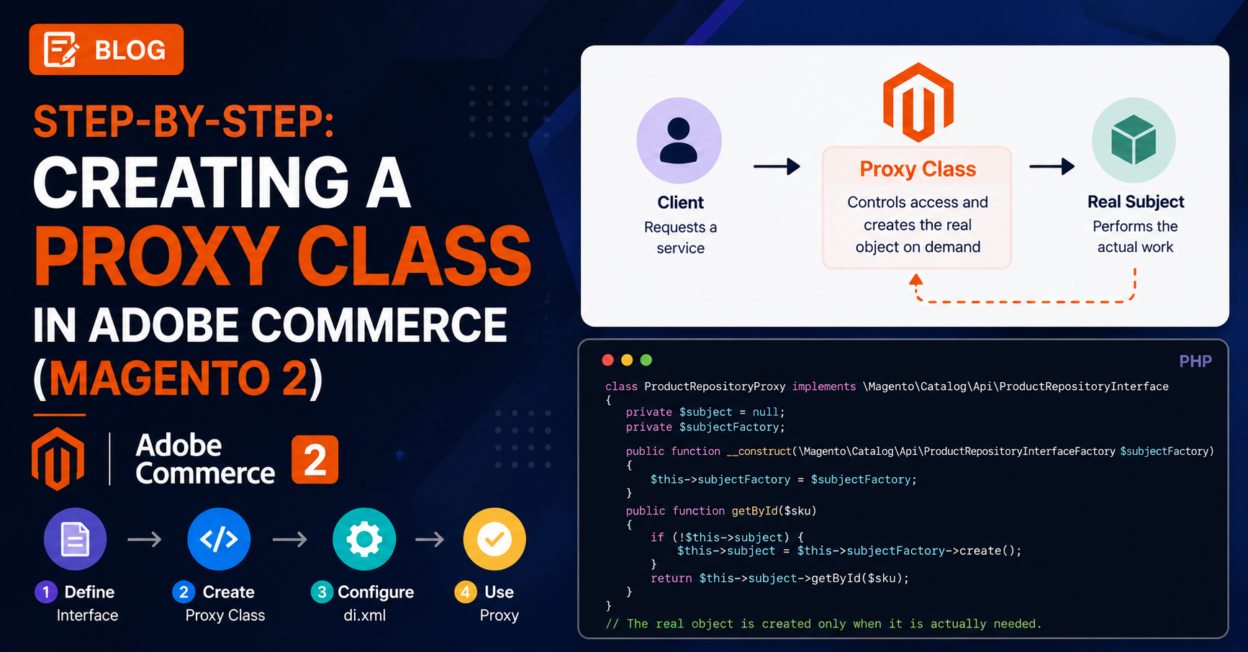
In our previous posts, we covered the Proxy Design Pattern and how Adobe Commerce uses it internally to boost performance. Now it’s time to get hands-on. This post walks through the exact steps to create and use a Proxy class in your own Adobe Commerce module.
Step 1: Identify the Class You Want to Proxy
Choose the class whose instantiation you want to defer. It must implement an interface (Magento’s proxy generator relies on the interface/class contract).
Example: Vendor\Module\Model\ExpensiveService
Step 2: Reference the Proxy in Constructor Injection (di.xml)
You don’t manually write the proxy class — Magento generates it automatically when you reference it with the \Proxy suffix in your class dependency.
Your consumer class looks like a normal, plain class:
php
<?php

namespace Vendor\Module\Model;

use Vendor\Module\Model\ExpensiveService;

class SomeConsumerClass
{
    protected ExpensiveService $expensiveService;

    public function __construct(
        ExpensiveService $expensiveService
    ) {
        $this->expensiveService = $expensiveService;
    }
}
To use a proxy instead of the real object, update your di.xml (this is the preferred approach, rather than hardcoding it in the constructor):
xml
<!-- app/code/Vendor/Module/etc/di.xml -->
<?xml version="1.0"?>
<config xmlns:xsi="http://www.w3.org/2001/XMLSchema-instance"
        xsi:noNamespaceSchemaLocation="urn:magento:framework:ObjectManager/etc/config.xsd">
    <type name="Vendor\Module\Model\SomeConsumerClass">
        <arguments>
            <argument name="expensiveService" xsi:type="object">
                Vendor\Module\Model\ExpensiveService\Proxy
            </argument>
        </arguments>
    </type>
</config>
Here, Vendor\Module\Model\ExpensiveService\Proxy tells Magento’s Object Manager to inject an auto-generated proxy instead of the real class.
Step 3: Let Magento Auto-Generate the Proxy Class
You don’t need to create this class manually. When Magento compiles or runs in developer mode, it will auto-generate the proxy under:
generated/code/Vendor/Module/Model/ExpensiveService/Proxy.phpThe generated class looks roughly like this (simplified):
php
<?php

namespace Vendor\Module\Model\ExpensiveService;

class Proxy implements \Vendor\Module\Api\ExpensiveServiceInterface
{
    protected $subject;
    protected $objectManager;
    protected $instanceName;
    protected $shared;
    private $subjectType = \Vendor\Module\Model\ExpensiveService::class;

    public function __construct(
        \Magento\Framework\ObjectManagerInterface $objectManager,
        $instanceName = \Vendor\Module\Model\ExpensiveService::class,
        $shared = true
    ) {
        $this->objectManager = $objectManager;
        $this->instanceName = $instanceName;
        $this->shared = $shared;
    }

    protected function _getSubject()
    {
        if (!$this->subject) {
            $this->subject = true === $this->shared
                ? $this->objectManager->get($this->instanceName)
                : $this->objectManager->create($this->instanceName);
        }
        return $this->subject;
    }

    public function someMethod(...$args)
    {
        return $this->_getSubject()->someMethod(...$args);
    }
}
Every method call on the proxy is forwarded to _getSubject(), which only instantiates the real object on first use.
Step 4: Run Code Compilation (Production Mode)
If you’re working in production mode, generated code isn’t created on the fly — you need to compile it explicitly:
bash
php bin/magento setup:di:compileThis scans your di.xml files, generates all required Proxy/Factory/Interceptor classes, and writes them into the generated/code directory.
Step 5: Clear Cache and Test
bash
php bin/magento cache:flushThen verify the proxy is working — for example, add a log statement inside the real class constructor and confirm it only fires when the method is actually invoked, not when the consumer class is instantiated.
Step 6 (Optional): Manually Create a Custom Proxy
In rare cases, you may want to hand-write your own proxy — for example, to add custom caching or access-control logic instead of just lazy loading. In that case:
- Create a class implementing the same interface as the real service.
- Inject the real class (or its factory) inside your custom proxy.
- Add your own logic (caching, logging, permission checks) before delegating calls.
php
<?php

namespace Vendor\Module\Model;

class CustomServiceProxy implements ServiceInterface
{
    private ServiceInterface $realService;
    private $cache = [];

    public function __construct(ServiceInterface $realService)
    {
        $this->realService = $realService;
    }

    public function getData(string $key)
    {
        if (!isset($this->cache[$key])) {
            $this->cache[$key] = $this->realService->getData($key);
        }
        return $this->cache[$key];
    }
}
Register this manually via di.xml using a <preference> or virtualType if you want full control over the proxy behavior instead of relying on Magento’s auto-generated lazy-load proxy.
Conclusion
Creating a proxy class in Adobe Commerce is mostly a matter of configuration rather than code — reference the \Proxy suffix in your di.xml, let Magento’s Object Manager auto-generate the class, and compile it for production. This small change can meaningfully improve performance in modules with heavy or rarely-used dependencies.